Internet access

Internet access is via a network router that connects to a data socket in your accommodation. 

Getting connected requires your IT services Remote Access username and password. All network traffic will be logged against your username for audit purposes.

For more details about how the University processes personal data please visit the compliance website to review the privacy policy.

The network is intended primarily for academic purposes with reasonable and limited use for social and recreational purposes is acceptable for tenants. All use must be legal and meet the University regulations and policies applying to all University ICT facilities. 

The people permitted to use the connection in the flat are those living in it. Ultimate responsibility for the service & activity on the connection lies with the individual whose remote access account is being used.
 

Did you know

By connecting to the service you agree to abide by all relevant law, rules and regulations, further information is available on the IT services, rules webpage.


Expand All

You will need

  1. An Eduroam Wi-Fi/VPN account also known as a Remote Access account. To set up your account visit the IT services remote access option webpage  . This uses the same username as your Oxford SSO account. For security, use a different password to your Oxford SSO account.
  2. To make sure your internet browser allows ‘pop-ups’.
  3. To allow pop-ups in browser visit allow pop-ups  .
  4. A Netgear router.
  5. A mains power adapter.
  6. 1 supplied network cable.

Notice

Do not use the blue cable included in the Netgear router box.

 
Image of router, power supply, wall data socket and network cable

Step-by-step setup

  1. Turning your router on - Plug the mains adapter into the wall and connect the power cable to the back of the router and press the power button on rear of the router. At this stage DO NOT connect your network cable to the router’s Internet port (highlighted blue).
  2. Router Reset – Your router should be reset. Wait until the 2nd LED is lit green then press and hold the reset button at the back of the router until all the LEDs blink green.

  3. Connect to your router – After the router has reset you need to connect to it and configure it.

    Wireless Connection: The label on the bottom of the router has the connection information i.e. Wi-Fi network name (SSID on your device - choose the name ending in 5G or 5GHz) and password (passphrase/network key).

    Image of Wireless connection labels
  4. Connect to the management interface. When connected open a web browser and type in the following address: 192.168.1.1
    Note: If you see a Netgear Service Terms/Condition, screen select ‘I Agree’ and click ‘Apply/Next’

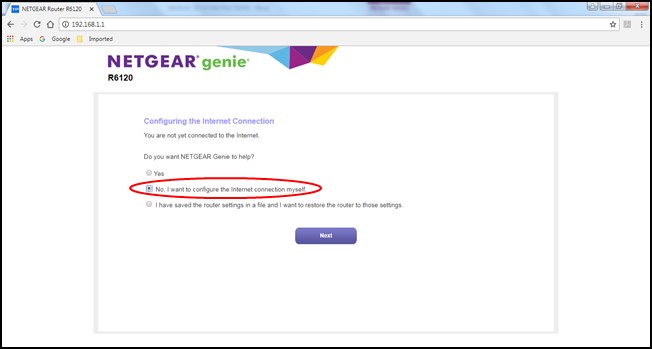
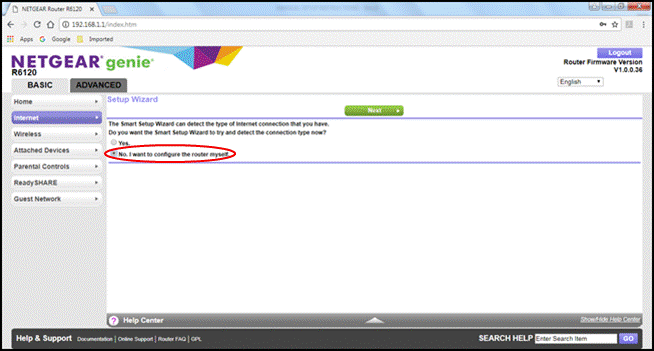
  5. On NETGEAR genie webpage select No, I want to configure the Internet connection myself and select NEXT.
    Image of step five, selecting NO, i want to configure the internet connection myself

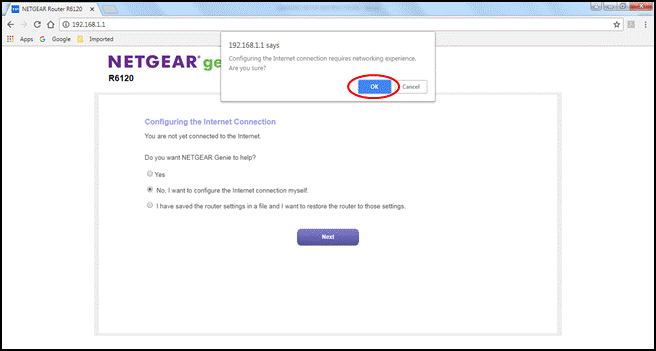
    Select OK on the pop-up screen.

    Image of step 5, clicking OK to configuring the internet connection.
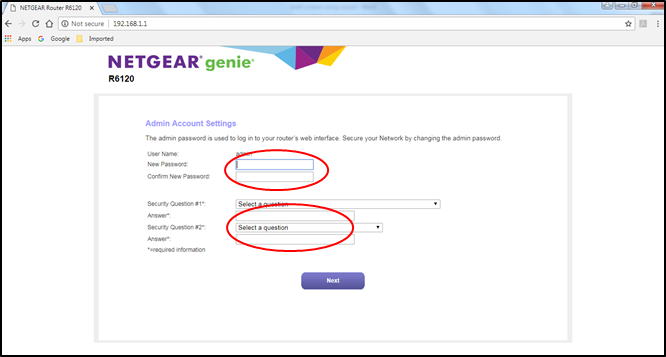
  6. You should now be on the Admin Account Settings page. Set a password for logging in to the router’s management page and set your own security questions and answers. Select NEXT and you will have to log in again with username: admin and the new password you have just set up.
    Image of step 6, adding new password, confirming new password and setting up your security question.
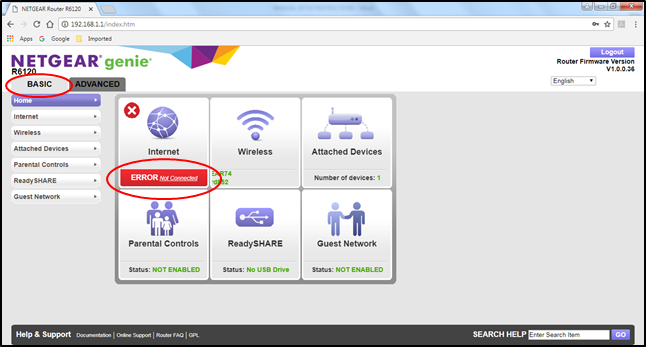
  7. Select the Basic Tab then the Internet ERROR Not Connected option.

    Image of step 7, selecting basic tab, then checking message ERROR not connected option
  8. Select No. I want to configure the Internet connection myself and select NEXT

    Image of step 8, Select NO, configure the internet connection myself
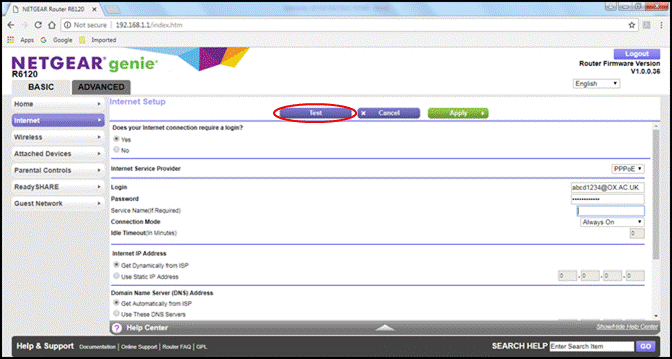
  9. Select Yes to Does your Internet connection require a login? The Internet Service Provider should be set to PPPOE. In Login enter your Single Sign On username including @OX.AC.UK (for example abcd1234@OX.AC.UK  ).

    In password, enter your Remote Access password. This is the same password you use for Eduroam. Click Apply and plug your network data cable between the router’s Internet port (highlighted blue) and your active wall socket.

    Image of step 9, Select Yes to does you internet connection require a login?

Select the internet setup Test button and you should see a successful connection screen. Do not register on the Netgear customer registration page instead Select the X (Close) button to close the registration pop-up window. On the ‘Are you sure page’ select option Do Not Create Account. You should now be able to browse the internet.

Important Note: To make your router secure change your router’s Wireless Wi-Fi logon password. See Change Your Router’s Wi-Fi logon password.

Change Your Router’s WiFi password:

Log in to your router’s management page at 192.168.1.1 with the username & password you set up at Step 6. Now go to Basic – Choose Wireless – There are passphrase sections for the 2.4 GHz & 5 GHz Wi-Fi so within each section go to Security Options (WPA2-PSK) and type your new passphrase. Note down your passwords as you will need them for your devices to log on to your router’s Wi-Fi
 

Note

If you had problems configuring your router see Common Problems below.


Cannot access routerlogin.net or 192.168.1.1 address

  • Switch off your device/laptop
  • Disconnect the network cable from the router’s Internet port (highlighted blue) on rear of your router
  • Reset your router as detailed in Step 2 in these instructions
  • Switch on your device/laptop and continue from Step 3 in these instructions

No Test success or Customer Netgear Registration page opened in your browser at Step 9

  • Pop-ups need to be enabled in your web browser. visit allow pop-ups'. Once pop-ups are enabled, log in to router and do Test again or start from Step 1 in these instructions

3rd LED on your router lit amber/orange?

3rd LED on your router is not lit green

  • Check your network cable is in your active wall socket & the internet port on rear of your router
  • Only one wall socket in your Flat is active so is there another wall socket to try?
  • The network cable could be faulty so do you have another cable to try?
     

How do I report a problem with my internet?

Please call 01865 280923 or email graduate.accommodation@admin.ox.ac.uk and confirm the following:

  1. Your OXFORD Single Sign On (SSO) username:
  2. Contact email & Telephone number:
  3. Site / Building / Room:
  4. How you are connecting: wireless/wired?
  5. Are there 3 LEDs lit green on your router?

Have you set up your Remote Access account password?

I am due to leave my accommodation, what should I do? When leaving your accommodation, reset the router by holding the reset button for at least 10 seconds until all of the lights come on. This wipes your logon credentials.

What can I use the service for?

The network is intended primarily for academic purposes but the reasonable and limited use for social and recreational purposes is acceptable for tenants. All use must be legal and meet the University regulations and policies applying to all University IT services facilities.

Who can use the connection in my flat?

The only people permitted to using the connection in the flat are those living in it. Ultimate responsibility for the service and all activity on the connection lies with the individual whose remote access account is being used.

Get connected


Download and print a PDF version of the step-by-step instructions to connecting to the internet. 

DOWNLOAD

Contact us


Graduate Accommodation team

+44 (0) 1865 2 80923

graduate.accommodation@admin.ox.ac.uk

Our offices are open Monday to Friday 9:00 - 17:00